PARA1
PARA2
Line 2
goes home.

Size 2
Color Red

Basic HTML Tutorial
Whoo. Lain's here to teach you some HTML. This HTML is basic, for absolute newbies, so if you are here to learn more advanced stuff, you've gotta wait. If you would like me to notify you as to when the advanced HTML tutorial is coming up, then just e-mail me about it, with "Advanced HTML Tutorial Notification" as your topic, and I'll get to ya right away on it ^_^ You can also ask any other questions you need, such as clarification on this tutorial. Anyway, I honestly believe in the concept of handcoding. This tutorial teaches you how to handcode general HTML- which can be used to make very basic webpages, and can be used in forum sigs- where the forums allow HTML use. -Lain
This tutorial was written in Notepad. Not only that, it is © Lain. And is hosted on Leonhart.Net. Duh. ;] (This all was just to actually make the note longer. XD). Now, this is an actual note: DO note that HTML tags are NOT case-sensitive. This means that you can use EITHER lowercase or uppercase. I dont know about sticky-caps, but that's just plain weird. :P
|
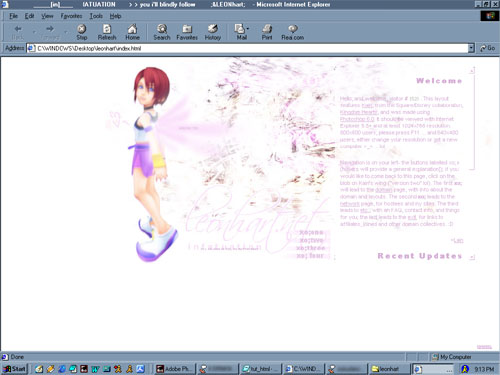
HTML; The HTML tag is pretty much the ground for the whole webpage. It starts at the exact beginning and end of a page. It starts with <HTML> and ends with </HTML>. The image is simply a minimized screenshot of version2 of Leonhart.Net. Do note that webpages do NOT necesarily need the <HTML> tags to work, at least in Internet Explorer and Mozilla (sp?). I'll check up on Netscape. |
|
TITLE/HEAD; The <TITLE> tag codes for what will go into the top bar. Either look up or click on the image and look at the top. You should get the idea. The title for this webpage was coded with what you see there, between <TITLE> tags. This tag is usually inside the <HEAD> </HEAD> tag, however it doesn't have to be (as shown above). Default TITLE BARS are the URLs of the page. The URL is what's listed inside the bar next to Address. For an example, please check out the Grunge Tutorial. I was too lazy to add the title, and apparantly, it's come into good use. |
| B; The <B> tag codes for bolded text. It is done by <B>BOLD</B>. | |
| I; The <I> tag codes for italicized text. It is done by <I>ITALICS</I>. | |
| U; The <U> tag codes for underlined text. It is done by <U>UNDERLINE</U>. | |
PARA1 PARA2 |
P; The <P> tag codes for paragraphs. For example, if you look at the first two paragraphs before this table begins, those were done with P tags. P tags pretty much separate two paragraphs by two lines. Think of it as, writing a document in a Word Processor, and entering twice. This example was done by <P>PARA1</P> <P>PARA2</P>. It is usually neater and easier to read if you reflect what is done on the page, in your Notepad file :) |
Line 2 |
BR; These tags are similar to the <P> tags, however, instead of entering twice, it enters once instead. This was done by Line 1<br>Line 2. It seems easier to do this than the P tags, but the P tags are more professional and more organized. ^^ |
goes home. |
A; This tag is a linking tag. It makes either a text or an image lead to another site. This is done by This <a href=http://leonhart.net class=text target=_blank>link</a>. The a is required for all links. It must start with a. The href in this code is what it will lead to. The URL MAY be put in quotations, but it isnt necesary unless the URL has a space. For links to open up in new windows, target=_blank must be used. Alternatively, you can use target=new, however I am more used to _blank ^^ Ignore the class=text. At a basic level, it isn't necesary. ^^ You'll have to read into the CSS Tutorial for that (which won't get up in a LOOONG time o_O). |
|
IMG; Images are very important on a webpage. Visuals are definitely a must. So, you must know this code. XD This image was done by <img src=tut/html_IMG.jpg>. The IMG is like the A, and is necesary in definitely absolutely needed. Or else it wouldn't be an image tag. ;P SRC means source- this, therefore, is the source of the image. To be viewed by everyone, the image must be uploaded onto the web. So unless it is in a directory on your website, you cannot link it like I have mine linked- you must link it with an http:// in front of it. You can also add a border=#, where the number is the pixel number of the border. Currently, the border is 0. You can also have an alt="text here" in it, so that when you hover over the image, "text here" will appear. :) |
Size 2 Color Red |
FONT; The font tag is also very important. Unless you're using CSS, the font will be automatically set to Times New Roman, Black, 3 (usually, unless you have a different font setting). This tag lets you change it to any font (though, do note that it MUST be on the other person's computer to display properly- Verdana, Times, Courier, and Arial are all common fonts), color and size. <font face="courier" size=2 color=red> text here </font>. Face determines the font. You should have the font within quotes, ESPECIALLY if it has a space in between (ie: "century gothic"). Size can range from 1 to 7. Two or three is best for general reading; the higher numbers should be used for headers and such. Color is any color that you want- it can be either the name (not too smart) or a hexidecimal- which is a number code for colors. |
|
COMBINE; From here, you should start playing around with the codes. For example, what I have just done is used an image to link to my website. This is done by <a href=http://leonhart.net target=_blank> <img src=html_IMGLINK.jpg> </a>. You should start tryi |
This tutorial is © (copyright) Lain. Meaning that I made this.
Please do NOT redistribute this on your own server without my permission.